
Showing posts with label Cooking. Show all posts
Showing posts with label Cooking. Show all posts
Sunday, March 11, 2012
Squash Mac & Cheese
I love Mac & Cheese. I think most people do. Any opportunity to add vitamins and fiber to a crowd-pleasing dish is A-OK in my world! I like this dish because the squash adds an extra layer of flavor, while cutting down on fat and adding lots of good vitamins.

Wednesday, March 7, 2012
Freezer meals (the basics, plus chili), Part 1 of many
So, when I go back to work, my husband is going to be on his own for dinner (for himself and baby) 4-5 nights a week. I'm hoping to eventually cut that down to 3 nights a week, but while I'm building my caseload, I'll be gone every night.
Like most people, he's so tired when he gets home from work that it's tough to get together a good, healthy meal without resorting to frozen pizzas and skillets.
Before baby, when we both worked, we did just that. We'd generally have frozen pizza one or two nights a week, those Bertolli skillet things at least once, and something really easy like spaghetti with sauce or mac and cheese. Then, once I was pregnant, I didn't go in the kitchen for almost 3 months. To be completely honest, I have no idea what my husband ate. Since the grocery store made me vomit, he did all the shopping, and as far as I know, he fed himself on like $25/week. All I could eat was tator tots and iced tea. I'm pretty sure he ate a lot of hot pockets, frozen pizza, and mac and cheese.
After Levi was born, I started changing our eating habits: more whole grains, fewer processed foods. I try to limit our skillet meals...those things have a TON of sodium. However, I was only working a few hours a week, so I had time to make good, whole food meals most days, even if it was in a crock pot. Don't get me wrong, we still eat those skillets sometimes, or frozen pizza, but I make an effort to keep our diet low in processed food.
So all of this leads me to my freezer meals project!
I'm starting of easy: crock pot meals. I love love LOVE the Reynolds slow cooker liners. They make it easy to store and freeze food, plus they give me a happy husband because he doesn't have to scrub out the slow cooker.
So here are the basics of freezer cooking in Mindy-land:
1. To store crock pot meals, I put the food in a slow cooker liner, twist it shut, and put that in a plastic gallon freezer bag labelled with the date, the food, and what needs to be added in the slow cooker.
 2. Most Crockpot recipes are pretty basic: Add veggies, add spices, add meat, freeze. Then add liquid or sauce when you put it in the slow cooker. Easy peasy.
3. The following things don't work well in a slow cooker or freezer (although there are exceptions): Noodles, rice, dairy, herbs, anything you want to eat crunchy.
4. Crockpot recipes are fabulous for adding extra veggies...shredded carrot can be hidden in almost any recipe. So can chopped onions.
So, without further ado, here's my first crockpot freezer recipe: Chili!
Chop half an onion, and 2 cloves of garlic. Grate a carrot. Place veggies in a bag with 1/2 pound of dried beans. Add 2 Tbs Worsteshire sauce, and a packet of your favorite chili seasoning. Top with a small can of tomato paste. Add in 1 pound of ground chicken, turkey, or beef. Freeze.
On the day you want to eat it, place crockpot liner of food in crockpot. Add 2 cans of beef broth. Cover and cook on high for 6 hours, or low for 8 hours. Serve with cheese, chopped green onions, and sour cream.

Like most people, he's so tired when he gets home from work that it's tough to get together a good, healthy meal without resorting to frozen pizzas and skillets.
Before baby, when we both worked, we did just that. We'd generally have frozen pizza one or two nights a week, those Bertolli skillet things at least once, and something really easy like spaghetti with sauce or mac and cheese. Then, once I was pregnant, I didn't go in the kitchen for almost 3 months. To be completely honest, I have no idea what my husband ate. Since the grocery store made me vomit, he did all the shopping, and as far as I know, he fed himself on like $25/week. All I could eat was tator tots and iced tea. I'm pretty sure he ate a lot of hot pockets, frozen pizza, and mac and cheese.
After Levi was born, I started changing our eating habits: more whole grains, fewer processed foods. I try to limit our skillet meals...those things have a TON of sodium. However, I was only working a few hours a week, so I had time to make good, whole food meals most days, even if it was in a crock pot. Don't get me wrong, we still eat those skillets sometimes, or frozen pizza, but I make an effort to keep our diet low in processed food.
So all of this leads me to my freezer meals project!
I'm starting of easy: crock pot meals. I love love LOVE the Reynolds slow cooker liners. They make it easy to store and freeze food, plus they give me a happy husband because he doesn't have to scrub out the slow cooker.
So here are the basics of freezer cooking in Mindy-land:
1. To store crock pot meals, I put the food in a slow cooker liner, twist it shut, and put that in a plastic gallon freezer bag labelled with the date, the food, and what needs to be added in the slow cooker.

3. The following things don't work well in a slow cooker or freezer (although there are exceptions): Noodles, rice, dairy, herbs, anything you want to eat crunchy.
4. Crockpot recipes are fabulous for adding extra veggies...shredded carrot can be hidden in almost any recipe. So can chopped onions.
So, without further ado, here's my first crockpot freezer recipe: Chili!
Chop half an onion, and 2 cloves of garlic. Grate a carrot. Place veggies in a bag with 1/2 pound of dried beans. Add 2 Tbs Worsteshire sauce, and a packet of your favorite chili seasoning. Top with a small can of tomato paste. Add in 1 pound of ground chicken, turkey, or beef. Freeze.
On the day you want to eat it, place crockpot liner of food in crockpot. Add 2 cans of beef broth. Cover and cook on high for 6 hours, or low for 8 hours. Serve with cheese, chopped green onions, and sour cream.

Monday, March 5, 2012
Recipe time! Whole Wheat Tortillas!

It's a good day. Mom made quesadillas!
I'm going back to work next week! Since halfway through my pregnancy, I've only been working 8-10 hours a week, and I'm going crazy! But I finally got the state of Illinois to cooperate, finally got my Psychotherapist license, and was hired on by my favorite internship site!
In preparation, I'm slowly filling the freezer with food. It's not that I don't trust my husband to get food on the table at night (since I'll be working evenings). It's that I don't trust my husband to get healthy, fresh food on the table while being followed around by my favorite Toddler.
First up for the freezer food: whole wheat tortillas!
Why tortillas? I mean, they're dirt cheap at the store, keep forever, and are easy to find. However, I've been making a commitment to try to get 75% of our grains as whole grains. And whole grain tortillas are a) expensive, b) not always 100% whole grain, and c) still full of a bunch of crap I don't want to feed my child. So I make my own, with only 4 ingredients. And they're delicious.
Tuesday, February 28, 2012
Yum yum, Spaghetti Squash!
I had so many plans for today...errands to run, projects to finish...but I still have a sick kiddo. All he has is a cold, but at 13 months, he's already perfected the Man Cold. He laid around all day moaning and wanting me to hold him, rub his back, and never ever do the one thing that might make him feel better (use the nasal aspirator). He also refused to eat much, threw milk at the dog, and followed me around whining "mamamamamama" no matter what I did.
So my plans were shot. Since I couldn't go anywhere, however, it was a perfect day to make spaghetti squash!
Most of my recipes are fairly quick and easy, but this one is time (but not labor) intensive. You kinda have to be home for at least 2.5 hours to make it happen. So it's a bad idea if I'm working or out running errands, but perfect for a cold day stuck inside. The good news? Your labor only takes 5-10 minutes at the beginning, and about 20 minutes at the end. The rest of the time you're just babysitting the oven. So here's how it happens:

Grab a spaghetti squash...they should be in your produce section of the grocery store by the butternut and acorn squash. Squash is wonderful: cheap, filling, and healthy. Butternut and acorn squash can both be used in mac and cheese and soup. Spaghetti squash is the oblong yellow squash. You can see the sticker on it up there. It should be labeled.
Preheat your oven to 350.
Cover a pan in foil. I bend up the edges of my foil to catch drippings. This isn't really necessary, but I hate doing dishes, and we have no dishwasher, so I cover pans in foil.
 Now it's time to cut the squash. This is the most challenging part of the whole thing. I use a long, skinny knife. Shorter knives get stuck, while the cleaver-like knives are impossible to get through the skin.
To start, I insert the point of the knife in the squash (to cut it lengthwise), and push it all the way through. You can see in the picture that the rind of the squash will crack (most of the time), which makes your life easier. Wiggle the knife around until it comes loose. Flip the squash over and do the same at the other end. More cracking, more wiggling.
 Find the biggest crack on the squash and put your knife horizontally in that crack. Press down. The crack should lengthen. You may have to repeat on the other side, but eventually the whole squash will crack in half.

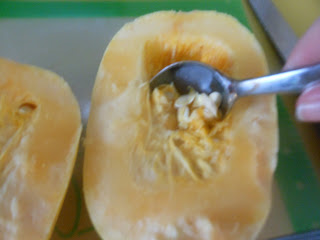 Next, scoop out the seeds. You can use a normal spoon, but I find an ice cream scoop works wonderfully. If you have a pumpkin carving spoon somewhere, that would work well, too. Pumpkins are squash, after all.

 Lay the squash face down on the foil-lined baking sheet. Put it in the oven, set your timer for 45 minutes.
After 45 minutes, turn off your oven. Leave the squash in the oven. You can open it and check to see if the squash has gotten squishy (if you have a large squash it might need a few more minutes; you want it just a little squishy), but put it back in and close the door.
This is where my method differs from most I've seen. Let me explain: I had a heck of a time for awhile where my squash would either be burned and dry, or not cooked enough. Even if I checked on it regularly, I'd miss that window of perfect squash-ness. This method keeps the moisture/steam from the squash in, and gives gentle heat for that last little bit of cooking. Added bonus: it will be cool enough to handle when it's done.
Leave the squash in the oven for 1 hour. Oven off, squash in. This is probably against every food safety guideline out there, but whatever. It makes delicious squash.


Toss with your favorite add-ons. Tonight we had sauteed mushrooms, red onions, and italian sausage, topped with mozzarella cheese. Yum.
Other favorites include pesto or marinara sauce (just make sure to go lightly, spaghetti squash gets soggy easily) with whatever veggies are available.
A great side dish: toss the squash with parmesean cheese, some bread crumbs, garlic, salt, and pepper. Yummy.
Traditional recipe format (because that's what people do):
Ingredients:
1 spaghetti squash (find one that's not the biggest or the smallest)
1 Tb olive oil
Instructions:
Preheat oven to 350 degrees F
Line a pan with aluminum foil
Using a long, skinny knife, cut the squash in half lengthwise
Scoop out the inside seeds
Coat the inside of the squash with olive oil
Place, cut side down, on foil-lined pan
Bake for 45 minutes
Turn off oven, but do not remove squash
Let it cool, in warm oven, for 1 hour
Remove from oven
Starting at the stem end, scrape "spaghetti" out of squash
Mix with your favorite toppings and eat!
So my plans were shot. Since I couldn't go anywhere, however, it was a perfect day to make spaghetti squash!
Most of my recipes are fairly quick and easy, but this one is time (but not labor) intensive. You kinda have to be home for at least 2.5 hours to make it happen. So it's a bad idea if I'm working or out running errands, but perfect for a cold day stuck inside. The good news? Your labor only takes 5-10 minutes at the beginning, and about 20 minutes at the end. The rest of the time you're just babysitting the oven. So here's how it happens:

Let's pretend for a minute that I don't have the ugliest counters that ever existed. And that I don't buy ginormous jugs of olive oil. Don't judge me.
Preheat your oven to 350.
Cover a pan in foil. I bend up the edges of my foil to catch drippings. This isn't really necessary, but I hate doing dishes, and we have no dishwasher, so I cover pans in foil.

To start, I insert the point of the knife in the squash (to cut it lengthwise), and push it all the way through. You can see in the picture that the rind of the squash will crack (most of the time), which makes your life easier. Wiggle the knife around until it comes loose. Flip the squash over and do the same at the other end. More cracking, more wiggling.


I promise


Pour a half tablespoon of olive oil in each half of the squash, then use your fingers to coat the squash halves. You could use cooking spray for this, but I recently discovered that it will kill us all or something. So I went out and bought a 3 liter bottle of EVOO.

After 45 minutes, turn off your oven. Leave the squash in the oven. You can open it and check to see if the squash has gotten squishy (if you have a large squash it might need a few more minutes; you want it just a little squishy), but put it back in and close the door.
This is where my method differs from most I've seen. Let me explain: I had a heck of a time for awhile where my squash would either be burned and dry, or not cooked enough. Even if I checked on it regularly, I'd miss that window of perfect squash-ness. This method keeps the moisture/steam from the squash in, and gives gentle heat for that last little bit of cooking. Added bonus: it will be cool enough to handle when it's done.
Leave the squash in the oven for 1 hour. Oven off, squash in. This is probably against every food safety guideline out there, but whatever. It makes delicious squash.

Just out of the oven squash. See the yummy roasted parts?

Next, use a fork to scrape from the stem end down. The spaghetti strands will start to separate.

Other favorites include pesto or marinara sauce (just make sure to go lightly, spaghetti squash gets soggy easily) with whatever veggies are available.
A great side dish: toss the squash with parmesean cheese, some bread crumbs, garlic, salt, and pepper. Yummy.
Traditional recipe format (because that's what people do):
Ingredients:
1 spaghetti squash (find one that's not the biggest or the smallest)
1 Tb olive oil
Instructions:
Preheat oven to 350 degrees F
Line a pan with aluminum foil
Using a long, skinny knife, cut the squash in half lengthwise
Scoop out the inside seeds
Coat the inside of the squash with olive oil
Place, cut side down, on foil-lined pan
Bake for 45 minutes
Turn off oven, but do not remove squash
Let it cool, in warm oven, for 1 hour
Remove from oven
Starting at the stem end, scrape "spaghetti" out of squash
Mix with your favorite toppings and eat!
Subscribe to:
Posts (Atom)